Creating a mobile application with React Native - part 4
This fourth part in the React Native article series will be dedicated to adding an artist search feature.
Create the search scene
The initial scene will stay the album list, but we will add it a search button. A tap on this button will display a search screen on top of the album list. This last scene will be created in a file named search.js:
1import React, { Component } from 'react';
2import { InteractionManager } from 'react-native'
3import { Button,
4 Content,
5 Container,
6 Header,
7 Input,
8 InputGroup,
9 List,
10 ListItem,
11 Icon,
12 Spinner,
13 Text,
14 Thumbnail,
15 Title } from 'native-base';
16var superagent = require('superagent');
17
18export default class TrackList extends Component {
19
20 constructor(props) {
21 super(props);
22 this.state = {
23 loading: false,
24 results: null
25 }
26 }
27
28 search(name) {
29 if(name.length < 3) {
30 return
31 }
32 superagent.get('http://api.deezer.com/search/artist?q=artist:' + name)
33 .set('Accept', 'application/json')
34 .end((err, response) => {
35 if (response.ok) {
36 this.setState({
37 loading: false,
38 results: response.body.data
39 });
40 }
41 else {
42 this.setState({
43 loading: false
44 });
45 }
46 })
47 }
48
49 back() {
50 this.props.navigator.pop();
51 }
52
53 displayAlbums(artist) {
54 var route = {
55 scene: 0,
56 title: artist.name,
57 artistId: artist.id
58 }
59 this.props.navigator.replacePrevious(route)
60 this.back();
61 }
62
63 render() {
64 if(this.state.loading) {
65 return (
66 <Container>
67 <Header>
68 <Title>search in progress...</Title>
69 </Header>
70 <Spinner color="#440099"/>
71 </Container>
72 );
73 }
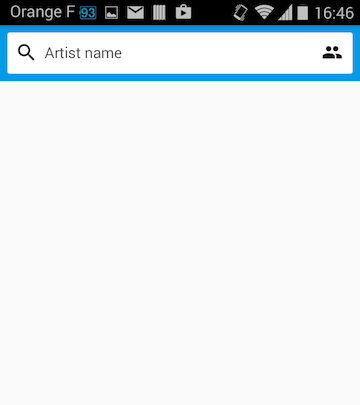
74 else {
75 return(
76 <Container>
77 <Header searchBar rounded>
78 <InputGroup borderType="regular">
79 <Icon name="md-search" />
80 <Input placeholder="Artist name" onChangeText={(text) => this.search(text)}/>
81 <Icon name="md-people" />
82 </InputGroup>
83 <Button transparent>
84 Search
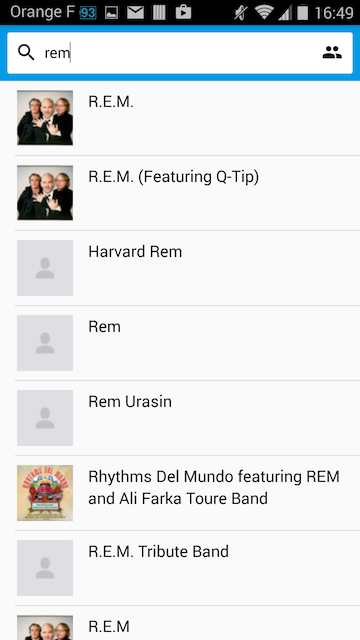
85 </Button>
86 </Header>
87 <Content>
88 <List dataArray={this.state.results}
89 renderRow={(item) =>
90 <ListItem button onPress={()=>this.displayAlbums(item)}>
91 <Thumbnail square size={56} source={{uri: item.picture_small}} />
92 <Text>{item.name}</Text>
93 </ListItem>
94 }>
95 </List>
96 </Content>
97 </Container>
98 );
99 }
100 }
101}There are some specific parts in this scene, compared to TrackList and AlbumList:
- first, the Header component (line 77) has an attribute “searchBar”, and contains the required components for displaying a search bar as defined by Native Base;
- second, the main content of the scene is a list of artists (line 88), updated by the
searchfunction (line 28) each time the content of the search field changes (as long as it contains at least three characters); - last but not least, a tap on an item in the result list (line 90) invokes the
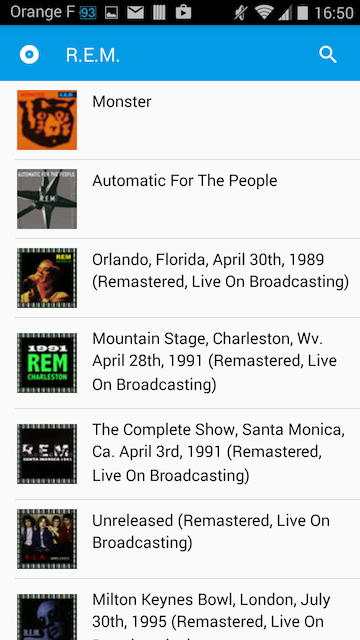
displayAlbumsfunction (line 53) that replaces the route for the underlying album list. The new route contains the reference of the artist on which the user tapped.
Update the main class to integrate the search scene
Then we need, as usual, to import this new scene in the app. In index.android/js, add:
import Search from './search';
We could add an else if clause in the renderScene function, or replace the existing if...else with a switch...case. But these solutions, although effective, will produce a code with a poor readability when the number of scenes continues to grow. That’s why I prefer the following form, with an array:
  renderScene(route, navigator) {

    var scenes = [
      <AlbumList title={ route.title } artistId={ route.artistId } navigator={ navigator } />,
      <TrackList title={ route.title } albumId={ route.albumId } navigator={ navigator } />,
      <Search navigator={ navigator } />
    ]
    return(scenes[route.scene]);
  }
We will now simplify the initial rendering: by default we not not display anything in the album view (Good bye Daft Punk!). Doing this just require to remove the album ID and title from the initial route:
  render() {
    return (<Navigator
        initialRoute={ { scene: 0 } }
        renderScene={ this.renderScene.bind(this) }
      />);
  }
This results in a rather austere home screen for the app, but I’ll let the improvement of this screen as an exercise to the reader ^^.

Adapt the AlbumList scene
Finally, modify the render function in albumlist.js to add a search button in the header of the Album list:
<Header>
   <Button transparent>
      <Icon name="md-disc" />
  </Button>
   <Title>{this.props.title}</Title>
   <Button transparent onPress={()=>this.displaySearch()}>
      <Icon name="md-search" />
   </Button>
</Header>
And add a displaySearch function in this same file:
// display the search scene
displaySearch() {
  var route = {
                scene: 2
              }
  this.props.navigator.push(route);
}
A tap on the search button in the header will invoke displaySearch and so display the search scene in front of the album list.
The search feature is now complete:
Conclusion
The array of scenes in the renderScene function could probably be replaced with a better solution. Maybe each scene could define it’s of rendering function and initialize it with data passed through the route. Some frameworks could offer elegant solutions too. But for the sake of simplicity, we’ll stick to this implementation.
In the next part, we will add the support of the Android back button.
Comments
comments powered by Disqus