An introduction to the Elm programming language
Authors:
This workshop comes in two flavors:
-
a full version, in which you need to install elm and a few tools, using npm, on your computer. in this version you will use the editor of your choice, and learn how to write unit tests, in addition to create an app. You will need around 3 hours to complete this version. If you don’t have enough time now, don’t worry, everything is provided in order you can finish it later.
-
a short version, in which you don’t need to install anything on your computer. You will use an online editor. This environment does not allow executing unit tests. So the last part of the full tutorial, which adds new feature in a TDD way, will be skipped. That’s why this version will be a bit quicker to complete than the full one.
This document is the material for the full version.
1. Workshop objectives
After this workshop, you should be able to create and test a basic Elm application.
1.1. The content of the workshop
-
practical: GUI of an image search engine
-
introduction to language and tools
-
first steps with elm
-
basic principles of functional programming
-
the architecture of an elm application
-
client / server communication
-
test an elm application, use the Debug module
The workshop duration will probably be not long enough for you to do all of this. This is deliberate, so don’t worry. But you can continue later if your interest was caught.
The solutions of the practical are available on github
2. Introduction to Elm
2.1. The Elm language
-
Elm is a functional language, whose compilation generates Javascript.
-
It has very strong typing
Image : User Henryhartley on en.wikipedia - license GFDL or CC-BY-SA-3.0, via Wikimedia Commons
Elm means elm, like the tree ("orme" in French), it’s not an acronym, so it’s written in lowercase.
Elm is one of the simplest functional languages available today. This translates into a limited number of concepts in the language. This simplicity is due to the will of the creator of the language to make it accessible to the greatest number of people.
The notion of type is more advanced than in Java for example. The compiler is able to infer the type of all expressions.
2.2. A front-end language
| development in elm | |
| compilation & optimization |
Elm is a front-end language only (for the moment), it ultimately produces front-end javascript code.
The developer writes in elm, tests in elm.
The elm compiler compiles and optimizes the elm code into a concise and efficient javascript
code.
This code is not intended to be read by a human.
The elm code is not deployed in production, only the compiled Javacript is.
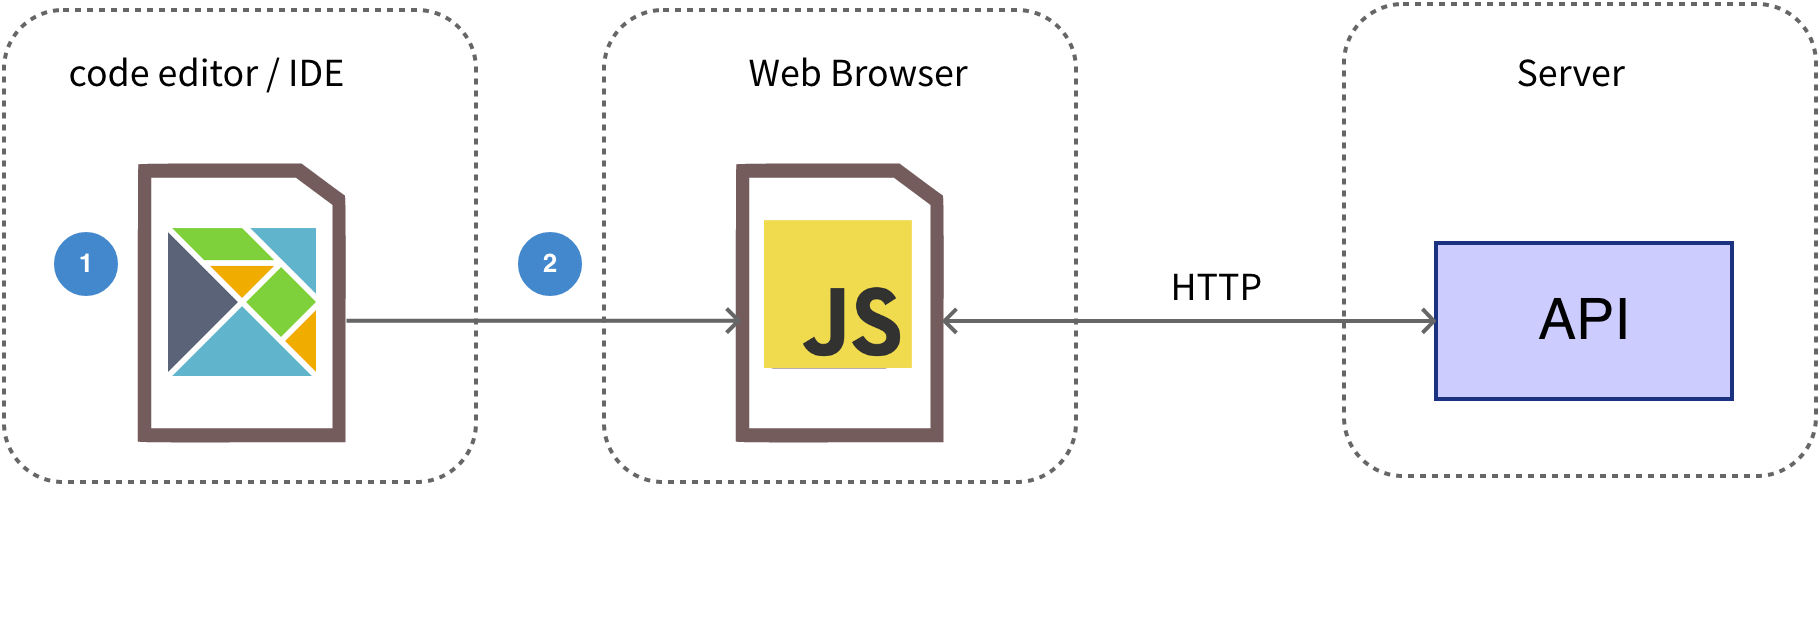
2.3. How do you use it?
-
compile elm to JS
-
include in the HTML page the file resulting from the compilation
-
call the init() function
|
|
It is possible for an elm app to interact with the native JS code. |
3. Installation
Prerequisites: npm
npm itself is installed as a part of nodeJS, so if you don’t have npm, you’ll need to install nodeJS.
To install the required tooling for the workshop, execute:
npm install --global elm elm-format elm-test
|
|
In case of rights issues under Linux, try this solution You should be able to use npm without sudo. |
4. Editors
There are plugins for:
-
Atom plugin, to be completed with elmjutsu
NB: the plugin must support elm 0.19
|
|
Some plugins are not maintained:
|
4.1. We recommend you…
-
Intellij/Webstorm/…
-
the elm plugin for this IDE
|
|
At the time of writing this document, this IDE is the one that offers to our knowledge the best support of Elm. Its use is absolutely not mandatory, you can of course use another tool if you prefer. |
4.2. Configure the elm plugin for Intellij
-
open
Preferences > languages & frameworks > elm -
use the auto-discover buttons for elm, elm-format and elm-test
-
if it does not work, use
which elm,which elm-formatand/orwhich elm-testto get the path to enter in thelocationfields -
check "Run when file saved?"
-
don’t worry if an error message appear in the elm-test section, it’s because you have no test yet
5. Hello, World!
5.1. Initiate an Elm project
Open a terminal, and in the root directory for you project, type:
elm init
elm init creates the elm.json file that describes the project dependencies.
5.2. A basic Elm application
src/Main.elm
module Main exposing (main) --

import Html exposing (text) --

main =
    text "Hello, World!" --
main =
text "Hello, World!" -- 
| A module is declared in a file of the same name. | |
| Imports the "text" function of the Html module. | |
The main function invokes the text + function
and passes it a string as a parameter
|
Select the elm.json file at the root of your project when the IDE will
suggest you to attach it.
5.3. Compile the application
In the terminal, type :
elm make src/Main.elm --output elm.js
-
The result of the compilation is a single JS file, regardless of the number of elm source files.
-
We never edit this file, whose highly optimized content is not designed to be read.
5.4. Format the code
If your IDE/editor does not format automatically the code, you should do it regularly by typing:
elm-format src/Main.elm --yes
5.5. Create index.html
Create an index.html file at the project root, where elm.js was generated.
index.html :
<!DOCTYPE html>
<html>
<head>
    <meta charset="utf-8" />
    <title>Elm image search</title>
    <script src="elm.js"></script>
</head>
<body>
    <app></app>
    <script>
        Elm.Main.init({ node: document.querySelector("app") })
    </script>
</body>
</html>| Loading the file resulting from the compilation | |
| The HTML node in which the application will be displayed | |
| Launching the elm application |
The init function takes as a parameter the reference of the node in which the application should be displayed
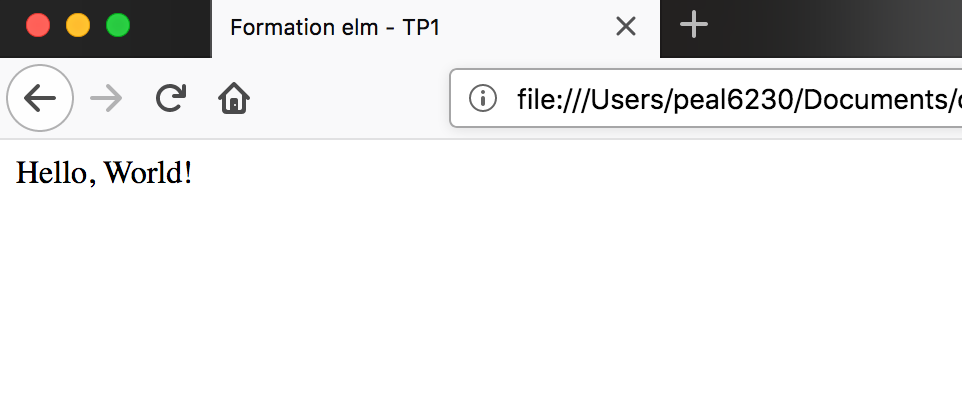
5.6. Expected outcome
Open index.html in the browser to see the result
6. First Steps
6.1. Produce some Html
src/Main.elm
module Main exposing (main)

import Html exposing (h1, text)

view =
    h1 [] [text "elm Image Search"] --

main =
view -- | call to function h1 of the Html module | |
| call the view function |
|
|
NB: added code is in bold type in all code blocks. |
Html has functions for each of the HTML language tags: div, p, etc.
These functions take two parameters: a list of attributes (class, onClick,
etc.)
and a list of children.
In the above example h1 has no attribute and has a single child, of the text type.
6.2. Add an input field
src/Main.elm
module Main exposing (main)

import Html exposing (..)  --
import Html.Attributes exposing (type_)

view =
    div []
        [ h1 [] [text "elm image search"]
        , input [ type_ "text"] []
        ]

main =
view| exposing (..) imports all functions and types of the module |
To avoid a conflict with the keyword type,
the "type" attribute of the HTML language is generated
by a function named type_
On the other hand, there is no problem for the name of the attribute class
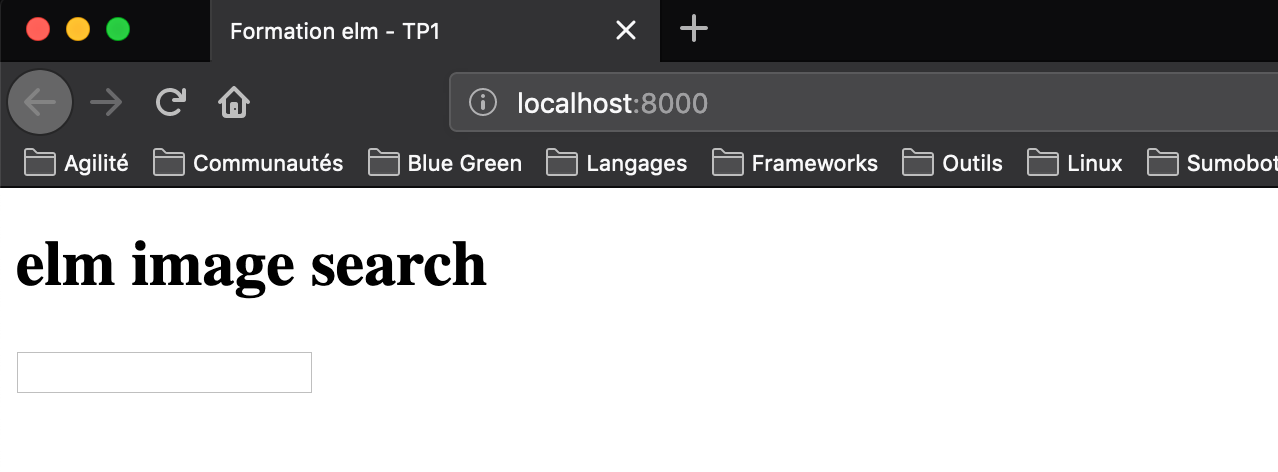
6.3. Expected result
7. Styles
7.1. Add a stylesheet
Get bulma.min.css, and then save it to the root directory of your project.
index.html :
<!DOCTYPE html>
<html>
<head>
    <meta charset="utf-8" />
    <title>elm Image Search</title>
    <link rel="stylesheet" type="text/css" href="bulma.min.css" />
    <script src="elm.js"></script>
</head>
...|
|
|
7.2. Add CSS classes
src/Main.elm
module Main exposing (main)

import Html exposing (..)
import Html.Attributes exposing (class, type_)

view =
    div [ class "container" ]
        [ h1 [ class "title"  ] [ text "elm image search" ]
        , input [ type_ "text", class "medium input" ] []
        ]

main =
    view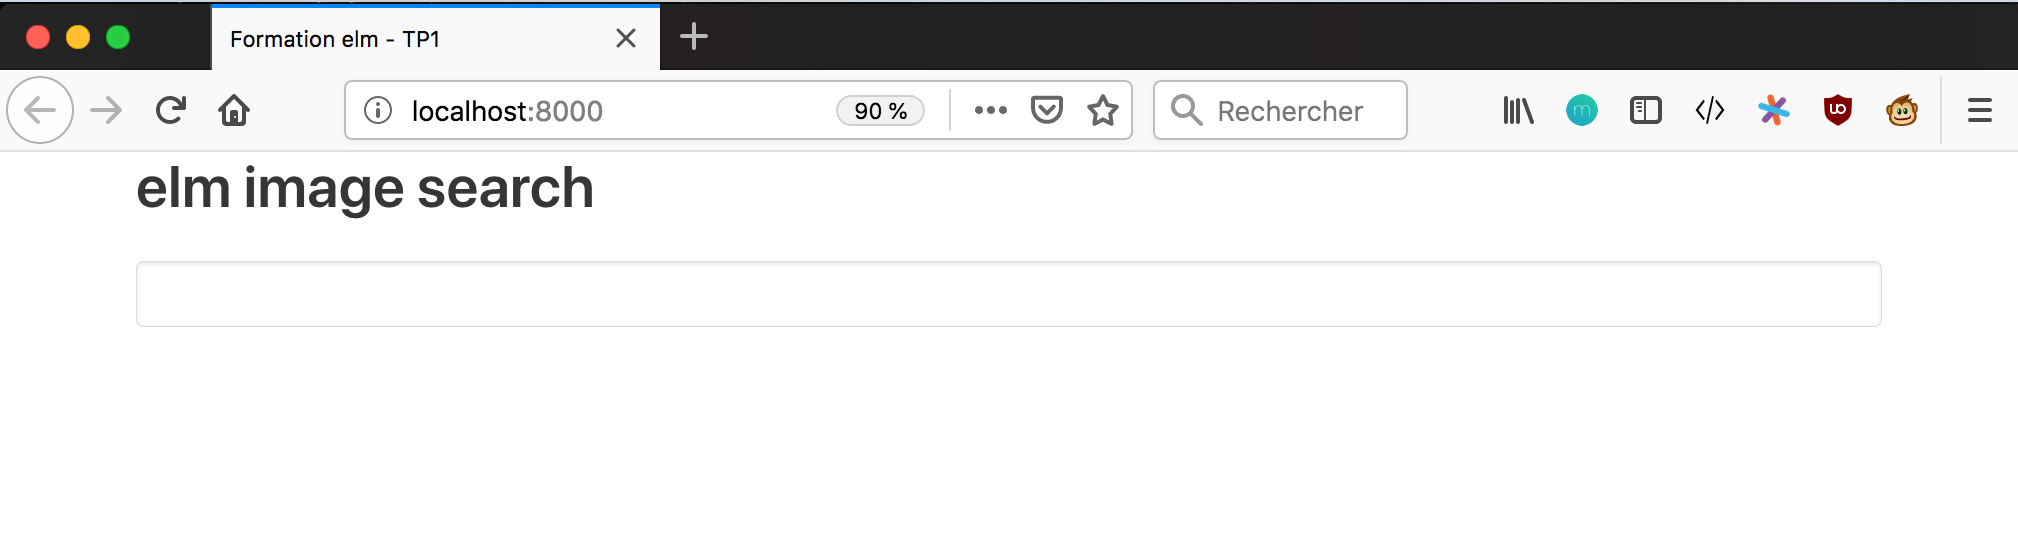
8. Functional programming: the basics
You may want to go directly to Type annotations if you’re already familiar with functional programming basics: pure functions, high-order functions, immutability, map/filter/reduce, lambdas…
8.1. Definition
In computer science, functional programming is a programming paradigm —a style of building the structure and elements of computer programs— that treats computation as the evaluation of mathematical functions and avoids changing-state and mutable data. It is a declarative programming paradigm, which means programming is done with expressions or declarations instead of statements.
source: Wikipedia
8.2. Immutability
Everything in Elm is immutable
This means a value or function cannot be modified after its creation
{-- no keyword var, val or def
everything is immutable value, even the functions --}

myNumber = 42

increment x =
x + 1|
|
You never change the value of a variable, it is not possible. For example, adding an item to a list is done by reusing the old list. The new item simply points to the first item in the old list, which is not modified. |
8.3. Higher order functions
Functional languages allow the use of higher-order functions.
A function is said to be of higher order when it takes at least one function as a parameter, and/or returns a function as a result.
8.4. Pure functions
A function is said pure if it does not produce any side effect.
The result of the call to a pure function depends only on
the value
of its input parameters, and does not modify anything other than its return
value.
This is why, for example, in elm an if must be followed by an
else.
This has advantages:
-
it’s easy to test
-
it’s often easy to understand
-
it’s powerful in case of multithreading (which Elm does not allow us, because it is based on JS)
All Elm functions are pure. It means:
-
they are not based on any external state
-
they do not produce any side effects
-
they must return a result
8.5. List functions
Immutability implies you can’t do a for loop in Elm : you cannot change
the index value at each iteration.
Instead why you will use some functions applicable to lists, typical of functional programming:
-
mapto apply a transformation to each item in the list; -
filterto extract from the list items matching a given criteria; -
fold(namedreducein some other languages) to build a new data structure from the list.
8.6. Lambda
Lamba = anonymous function
Example:
List.map (\x -> x + 1) [1, 2, 3]
A lambda is a function that has no name.
In the example, the lambda is applied to each element of the list, by the map function of the List module. It will add 1 to each item in the list. x is the value of the current element. The result will be a list containing [2, 3, 4].
|
|
In elm the "antislash" character is used to introduce an
anonymous function. |
9. Type annotations
Type annotations are very important in elm, although they are optional. In addition to documenting your code, they help the compiler to provide clear user messages.
The type annotation defines the return type of a function. It’s written just above the function name, like:
increment : Int -> Int
increment x =
    x + 1
A type annotation in Elm is:
-
the name of the function or value;
-
the colon symbol;
-
a series of types separated by arrows.
The last type is the return type.
increment : Int → Int means the function increment takes an Int
as a parameter and returns an Int.
A type name in Elm always starts with an uppercase letter.
sum : Int -> Int -> Int -- takes two Int as parameters, and returns an Int
sum a b =               -- a and b are integers
    a + b
Some types are parametrized. By example:
wordCount: List String -> Int -- takes a list of strings as parameter,
                              -- and returns an Int
wordCount words =
    ...
A type maybe generic. In this case, the type name will use one or more lowercase tags.
By example List a is a generic list (similar to List<Any> or
List<T> in some other languages).
List.length: List a -> Int -- takes a list of any type as parameter,
                           -- and returns an Int
List.length myList =
    ...
You can chose any name for the tags, the only constraint is to start with a lowercase letter. It allows to give an indication of what this type should contain.
view: Html msg -- takes no parameter,
               -- and returns some Html which can emit any kind of message
               -- or no message at all
view =
    text "Hello, World!"
Parentheses in an annotation type identify a function. Some examples:
apply: String -> (String -> List Int) -> Bool -- takes a String
                                              -- and a function
                                              -- which converts a String
                                              -- to a list of integers,
                                              -- and returns a boolean

selectTransformation: String -> (Int -> Int -> Int) -- takes a String
                                                    -- and returns a function
                                                    -- which takes two integers,
                                                    -- and returns an integer
10. The Elm Architecture
The Elm Architecture is often refered as "TEA"
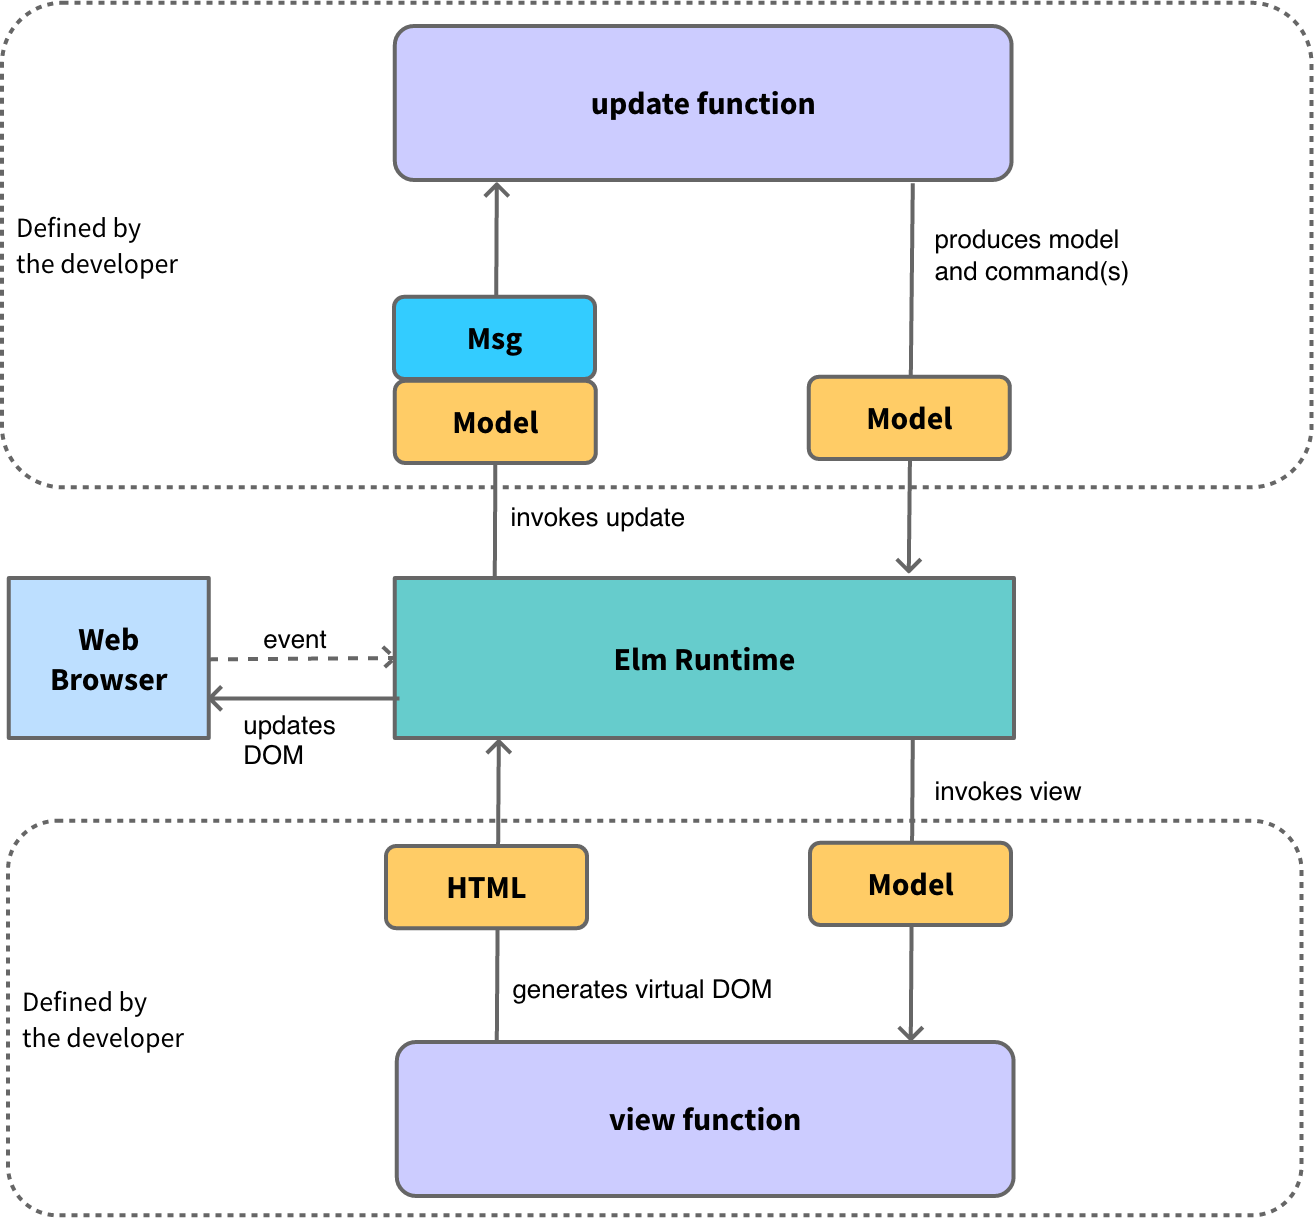
10.1. The MVU pattern
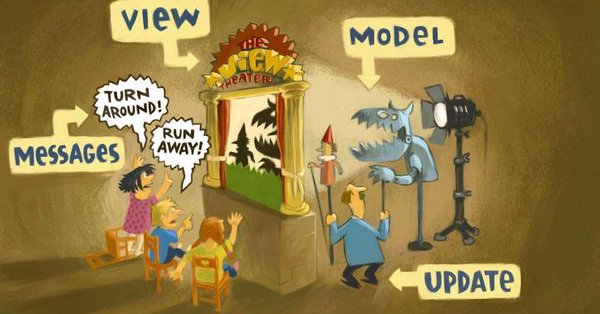
Image by Kolja Wilcke
The principle of the MVU pattern is as follows:
-
the application includes a template, a view function and an update function.
-
The view function is in charge of rendering the model (it will generate Html)
-
The view issues messages, for example to indicate that the user has modified the content of an input field or clicked on a button;
-
The update function processes these messages and updates the model accordingly
-
This pattern is called MVU : Model - View - Update
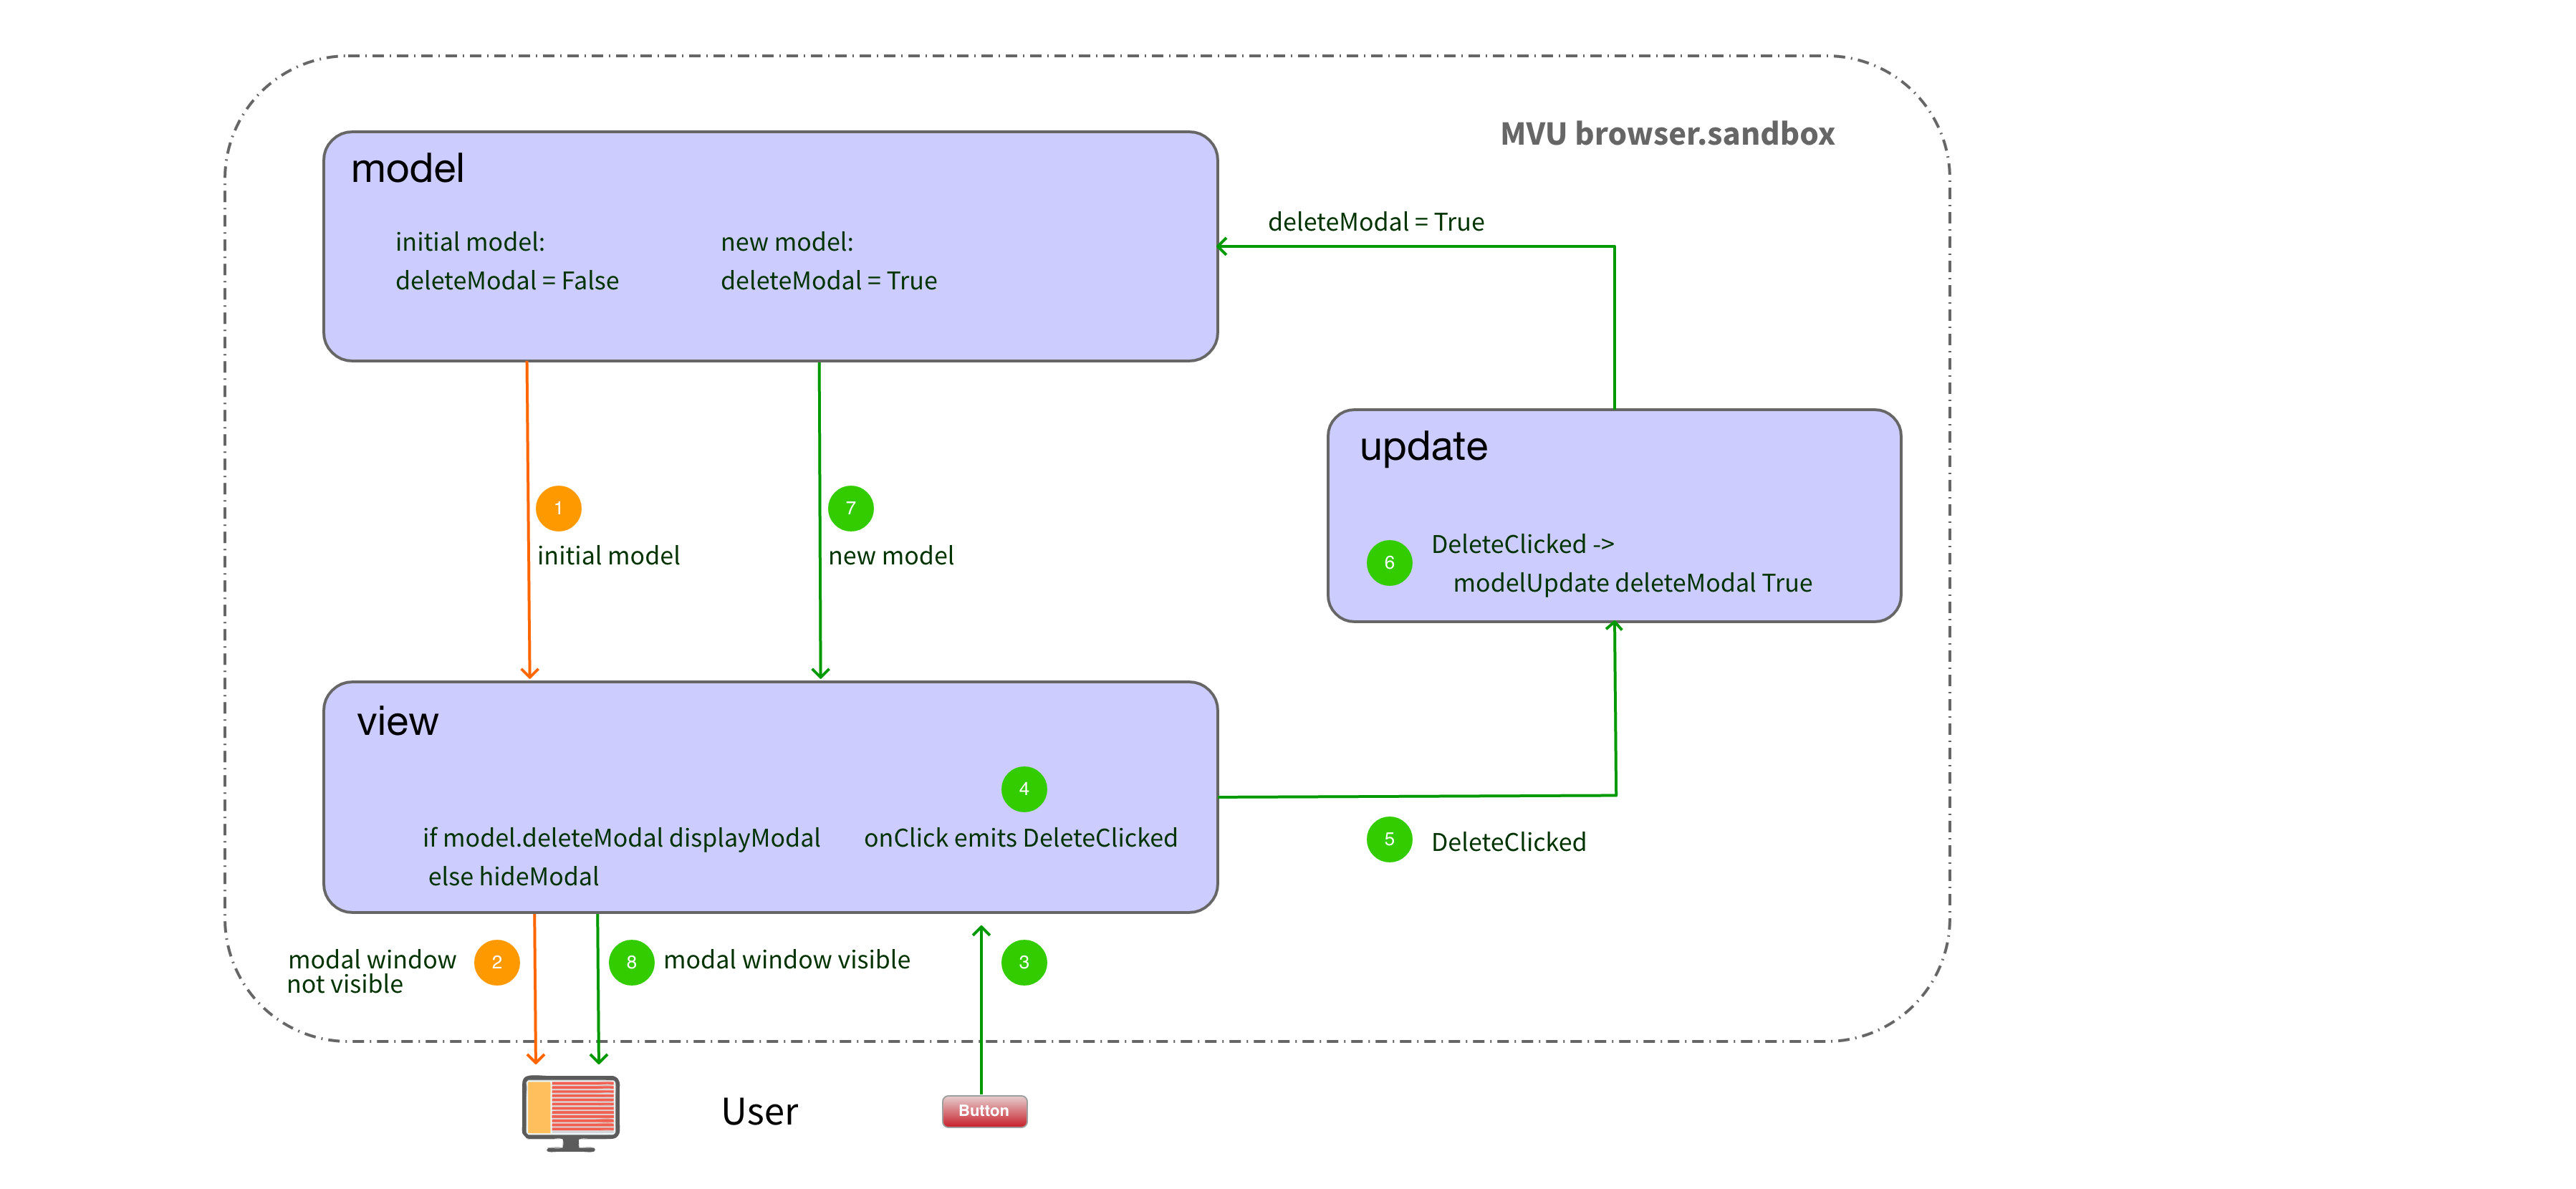
10.2. The MVU pattern by example
-
the model contains the state of the application (i.e. it is a store). Initially:
deleteModal=False
This model is sent to theviewfunction by the elm runtime when the application starts. -
the
viewfunction uses the initial template to decide whether or not to display the modal (i.e. delete confirmation pop-up) -
the user clicks on the "delete" button on the html page.
-
the view then issues a message indicating this click
-
the runtime invokes the update function, and transmits to it the current model as well as the message sent by the view.
-
the update function contains the logic to be applied for each message
forDeleteClicked, the logic consists in storing in the model with the new value of the fielddeleteModal
for this purpose, the update function creates a new model, which is a copy of the old one, but in which it gives the valueTrueto the fielddeleteModal. -
the runtime invokes the view function, and passes it the model it must render.
-
the new template contains
deleteModal=True, so the view function displays the modal allowing the user to confirm the delete.
10.3. Let’s make the runtime visible!

10.4. Typical structure of an elm file
-- import section
import ...

-- main function
main = main

{-- Type declaration --}
type Model....

update function and sub-functions of the update --}
update = ...

{--view function and view sub-functions--}
view = ...
The MVU is implemented in the main file of the application.
Due to the declarative nature of the language, it is not a problem in elm to create longer
file than in some other languages. Here the sections are separated by multi-line comments.
10.5. Implementation of the elm architecture
TEA uses Browser module
-
Install the Browser module
elm install elm/browsermodule Main exposing (main)
import Browser
import Html exposing (..)
import Html.exposing attributes (class, type_)
...|
|
The Browser module exposes four functions that implement the elm architecture. These functions depend on the type of application you want to create. The Browser module documentation details them. |
10.6. Define a type for the model
All the functions of the Browser module require a model.
Our model will be a simple chain of character.
import Html.Attributes exposing (class, type_)

type alias Model =
    String

initialModel : Model
initialModel =
    ""
alias type, as its name suggests, allows you to define a
synonym for a type.
|
|
initialModel is the variable - or function, it’s the same in elm, which defines the initial value of the model (here an empty string) Often this function is called |
10.7. Invoke Browser.sandbox
Browser.sandbox takes a record as a parameter
main =
    Browser.sandbox
        { init = initialModel
        , view = view
        , update = update
        }
A record is the name in elm for a structure.
The record expected by the sandbox function must have three fields:
-
init, whose value is that of the initial model of the application
-
view, whose value is the reference of the function in charge of rendering the model visually. In our code this function is called view.
-
update, whose value is the reference of the function that updates the model. This function is usually called update.
It gives the "anchor points" of the runtime.
10.8. Define the events emitted by the view
Create a custom type
import Html.Attributes exposing (class, type_)

type Msg =
    InputChanged String

type alias Model =
    String
The Msg type is a custom type that will define the different messages that can be sent by the
view, and processed by the update function.
The declaration of a custom type lists the different constructors that can create a value of this type. For example, a Boolean type would be described by : True | False
For the moment there is only one case in which a message is sent. We will name the type
constructor InputChanged, because a message will be sent when the content of
the input field has been modified. As with a function or variable name, any name can be
chosen. It only needs to be unique and begins with a capital letter.
Each type constructor can accept 0, 1 or more parameters. It will be useful for us to know the new content of the input field. This is why we indicate that the InputChanged constructor takes a String type value as a parameter.
The result of a call to InputChanged is the creation of a message of type
Msg.
10.9. Type annotations
Add a type annotation to the main function.
main: Program () Model Msg
main =-
Adding type annotations documents the code, and allows the compiler to display more relevant error messages.
-
The main function does not take any parameter, and returns a Program () Model Msg, since it just calls Browser sandbox.
-
The brackets in the type annotation of the main function represent an empty tuple, called
unit. It is an empty value. -
In the Browser Sandbox documentation, "msg" starting with a lowercase letter is not a type but a label. It is equivalent to a generic type (like <T> in some other languages). Ditto for model.
10.10. Detection of events on the view
The Html.events module provides functions to react to user actions.
import ...
import Html.Events exposing (onInput)

...

view : Model -> Html Msg --
view model =
    div [ class "container" ]
        [ h1 [ class "title"  ] [ text "elm image search" ]
        , input [ type_ "text"
                , class "medium input"
                , onInput InputChanged ] []
]| Modify the type annotation to comply with Browser.sandbox requirements |
Each time the content of the input field is modified, the view will issue an
InputChanged message with the new value of the input field as a parameter.
Html is a type constructor, which takes a message type as a
parameter.
This type of annotation can be read as "The product view function of the Html that can send messages". And not just any messages: only those described by the Msg type we have defined.
10.11. Create an update function
view =
    ...

update: Msg -> Model -> Model
update msg model =
    model
The update function will receive in first parameter a message sent by the view.
update takes as second parameter the current model, and
returns the new model in result.
The simplest possible implementation for update is to return the current model, without modifying it. That is what we are doing.
|
|
When we say that the function update updates the model, it is for convenience, as the model is immutable. In reality, this function produces a new model, possibly from the old one, every time it is invoked. |
10.12. Update the model
update must update the template according to the content of the message. The
latter is analyzed using pattern matching:
update: Msg -> Model -> Model
update msg model =
    case msg of
        InputChanged value ->
            value
If the message is of the InputChanged type, the new template will be equal to the value conveyed by the message (i.e. the content of the input field).
Pattern matching (or "pattern filtering") is a control structure which allows you to choose one of several behaviors, by looking at how the message was constructed. It will also allow to deconstruct the content of the message (unboxing) to recover its value.
In our example, msg can only have been built by calling "InputChanged" followed by a String for now.
10.13. Time-Travelling Debugger
Compile in debug mode:
elm make src/Main.elm --output elm.js --debugEnter several characters in the input field, then click on Explore History to access the debugger
In the window that opens, you can see each message that has been sent.
Clicking on a message returns the application to the state it was in when it was sent.
In the right part we see the state of the model after processing the message by the
update function.
|
|
The history can be exported and then imported on another workstation. This makes it possible, for example, to replay and analyze a scenario that caused a bug on a colleague’s workstation. |
Click on resume to resume the execution of the application, otherwise it will be
frozen.
10.14. Let’s summarize: the elm architecture
The elm architecture is the structure of applications in this language. It is integrated into the language from the beginning and therefore eliminates the need for a framework.
-
the browser emits an event (following an action by the user for example)
-
the runtime, which is subscribed to this event, invokes the update function and passes it the current model + a message describing the event
-
the update function generates a new model
-
the runtime invokes the view function and passes it the new model
-
view generates a new virtual DOM and sends it back to the runtime
-
the runtime updates the real DOM
The code for this step is available on le dépôt github, at the tag step 3.
11. Communicate with a server
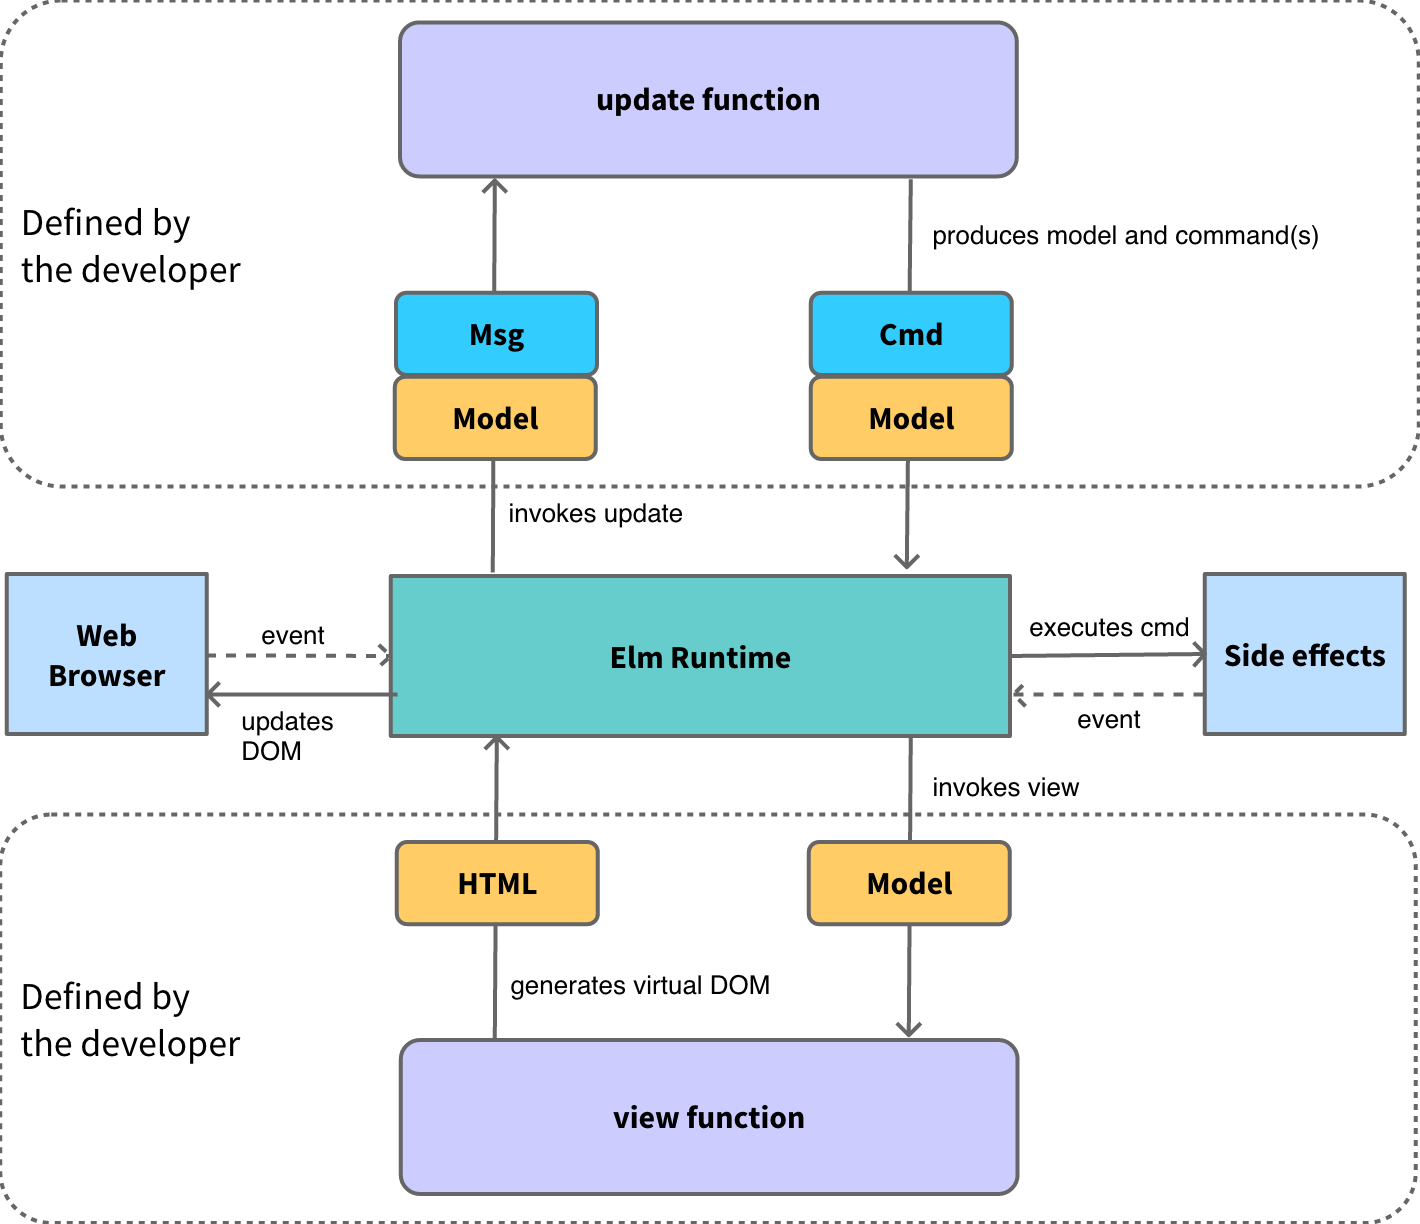
11.1. Side effects
-
Side effects are managed by the runtime
-
Side effects are invoked via commands
-
The result of a side effect is provided via a message
We can only write pure functions in elm. The result of calling a function with given parameter values will ALWAYS return the same value - which is convenient for testing.
But what if you have to do an operation with a different result? For example, generate a random number? Or make an http request?
In this case we will have to issue a command that will ask the elm runtime to execute the impure function. The runtime will provide the result of executing this impure function by invoking the update function. The message may contain, for example, the random number generated.
11.2. Elm architecture with side effects
Compared to the simplest version of the elm architecture, we will have additional notions to manage the processing that causes side effects.
-
the update function generates a new model, and possibly a command
-
the runtime executes the command. This is where all side effects are processed (HTTP request, random number generation, etc.). The commands are asynchronous.
-
when the execution of a command ends, the runtime invokes the update function, and passes the current model a message that describes the result of the execution of the command (success or failure, value, etc…) ⇒ return to step 1
11.3. Change application type
Replace Browser.sandbox with Browser.element and compile
main =
    Browser.element
        { init = init
        , view = view
        , update = update
        }
Browser.element, unlike Browser.sandbox, allows you to interact with the world outside the application. Browser.element takes a record as a parameter with an additional field, subscriptions. The compiler clearly indicates which field is missing.
11.4. Implement subscriptions
Provide a minimum implementation of subscriptions to Browser.element :
subscriptions : Model -> Sub Msg
subscriptions model =
    Sub.none

main =
    Browser.element
        { init = init
        , view = view
        , update = update
        , subscriptions = subscriptions
        }
subscriptions is a function that allows you to subscribe to function calls from
the JS or elm runtime,
like the ticks of a clock.
In the immediate future, we will provide a subscription implementation that does nothing.
It will therefore return Sub.none, regardless of the value of the model passed to it as a
parameter.
11.5. Adapt the initialization function
Replace initialModel by a function named init:
init : () -> (Model, Cmd Msg) --
init _ = --
    ("", Cmd.none) --
...
main =
    Browser.element
{ init = init| () = Unit = empty tuple = no value | |
| _ = unused parameter | |
| tuple (initial model, no command) |
The compiler reports that the functions expected by Browser.element have
signatures different from those used by Browser.sandbox
init and update must return a tuple with a Model record and a command.
The initialization function must also accept a flag as the first parameter. Flags are values that can be transmitted by the JS code when initializing the elm application (by adding a flags property to the object passed as a parameter to init())
For now, we don’t need a flag, so it will be initialized to Unit.
Unit is just an empty tuple. It is used to represent an empty value.
11.6. Adapt the update function
update : Msg -> Model -> (Model, Cmd Msg)
update msg model =
    case msg of
        InputChanged value ->
            (value, Cmd.none)
As with the init function, update must now return a tuple, whose first element is the new value of the model, the second is the command to execute. Cmd.none tells the elm runtime that there is no command to execute.
In the rest of the practical we will introduce a command that will launch an HTTP request.
11.7. Add a form
The form tag around the input field is used to detect the validation.
    div [ class "container" ]
        [ h1 [ class "title" ] [ text "elm image search" ]
        , viewForm
        ]

viewForm : Html Msg
viewForm =
    form []
        [ input
            [ type_ "text"
            , class "medium input"
            , onInput InputChanged
            ]
            []
        ]
To maintain the readability of the view function,
the code that generates the form is extracted into a new
function named viewForm.
11.8. Declare a new message constructor
Add a message constructor to be used when the form is subbmitted:
type Msg
    = InputChanged String
    | FormSubmitted
The compiler will help you for the next steps.
A message can now be either an InputChanged or a FormSubmitted.
Gradually the possible types for a message will get richer.
They will represent all possible actions on the page.
The different message constructors do not necessarily have the same types of parameters, or even have no parameters as is the case for FormSubmitted.
11.9. Detect the validation of the form
-
import the
onSubmitfunction of theHtml.eventsmodule -
send a message
FormSubmittedwhen the form is validated -
make sure that the application compiles
11.10. Perform an HTTP GET request
Install the elm/http module:
elm install elm/httpThe documentation of the Http module gives the type annotation of the get function:
get :
    { url : String
    , expect : Expect msg
    }
    -> Cmd msg
11.11. Send an image search request
For now we will treat the answers as text.
FormSubmitted ->
  let --
    httpCommand = Http.get
      { url =
         "https://unsplash.noprod-b.kmt.orange.com"
         ++ "/search/photos?query="
         ++ model
      , expect = Http.expectString ResponseReceived --
      }
  in
( model, httpCommand )| declaration of local variables | |
| expectString indicates the type of response expected |
let … in allows you to declare local variables usable in the return value of the function.
ResponseReceived is the message that will be sent following the reception of the response. We will define this type constructor in a further step.
|
|
Here again it is good to let yourself be guided by the compiler. |
11.12. Digression: the Result type
The Result type represents a response to an operation that may fail. It has two constructors: one to encapsulate the result of a successful operation, one to encapsulate an error.
type Result error value
    = Ok value
    | Err error
is equivalent to:
type Result a b
    = Ok b
    | Err a
Remember, lowercase names are just tags, not types.
11.13. Declare the type of the response
The update function must process the responses to the HTTP request.
type Msg
    = InputChanged String
    | FormSubmitted
    | ResponseReceived (Result Http.Error String)
The HTTP module documentation tells us how it is used and the format of the response messages.
The message sent by the runtime when receiving a response to an HTTP request includes a Result type parameter. This type is itself configured. The first parameter of the type Result indicates the type that the result will have in case of failure (here Http.Error). The second parameter indicates the type of the result in case of a successful query (here a string).
(Result Http.Error String) is in brackets because it is the set that forms a type. Without
brackets, this would mean that the ResponseReceived type has three parameters,
of the respective types Result, Http.Error and String
-which is not consistent with the operation of the Http module. Thanks to the parentheses,
we indicate that ResponseReceived has only one parameter, of type
Result Http.Error String.
|
|
Continue to be guided by the compiler. |
11.14. Process the answer
The compiler tells us that a case is not processed by the update function:
    case msg of
        InputChanged value ->
            ...
        FormSubmitted ->
            ...
        ResponseReceived _ -> --
(model, Cmd.none)| For the moment, we don’t know the answer |
It is necessary to add a branch to the box to process the new case.
The compiler requires that all cases be processed. There can be no forgetting. It is thanks to this type of principle that an elm application never causes an error at runtime.
In the code above, the response conveyed by the response message is ignored. The model is therefore returned unchanged.
|
|
The compilation must be successful. |
11.15. Enrich the model
To display the server response, the model must contain the value entered by the user and the server response.
type alias Model =
    { searchTerms : String
    , response : String
    }
Changing the model type causes compilation errors. The compiler then tells us what changes to make to adapt the rest of the code. It is a typical elm experience. We are talking about Compiler Driven Development.
In the record type declaration the symbol : is used to separate the keys from
the types (as in all type declarations in elm).
The searchTerms field will be used to store the character string entered by the
user.
11.16. Initialize the new model
The initial value of the record fields is an empty string
There is no null value in elm.
init : () -> ( Model, Cmd Msg )
init _ =
    ( { searchTerms = ""
      , response = ""
      }
    , Cmd.none
)|
|
In the record initialization the symbol |
11.17. Use the record in the update function
InputChanged value ->
    ( { model | searchTerms = value }, Cmd.none ) --
FormSubmitted ->
  let
    httpCommand =
      Http.get
       { url =
            "https://unsplash.noprod-b.kmt.orange.com"
                ++ "/search/photos?query="
                ++ model.searchTerms --
       , expect = Http.expectString ResponseReceived
       }
  in
( model, httpCommand )| model update | |
| access to the value of the searchTerms field |
When we receive an InputChanged message, we will update the searchTerms field of the model to store the value entered by the user.
More precisely, as in elm everything is immutable, we will create a new model model, based on
the old one, in which the searchTerms field will have a value equal to that of the
value parameter of the InputChanged message.
|
|
For convenience, we say that we update the model, but from a theoretical point of view, it is an abuse of language. |
11.18. Update the model based on the response received
    case msg of
        InputChanged value ->
            ...
        FormSubmitted ->
            ...

        ResponseReceived (Ok jsonString) ->
            ( ..., Cmd.none ) --

        ResponseReceived (Err _) ->
( ..., Cmd.none ) -- | Store the received value in the response field of the model | |
| Store an error message in the response field of the model |
A Result object can be of the type OK or of the type Err.
If it is of type OK, its parameter will be the body of the Http response
returned by the server.
If it is of type Err, its parameter will be an Http
error, which should be analyzed with pattern matching to display a specific error
message.
For the time being, we will store a generic error message, hard-coded in the response field of the model.
|
|
You can verify the request being made and its response using the developer tools of your Web Browser You can also use the Elm debugger to verify the messages processed by the update function and the resulting model. |
11.19. Display the answer
-
create a
viewResponsefunction -
viewResponsetakes the model as a parameter and returns Html -
use
viewResponseto display the server response or error message under the input field
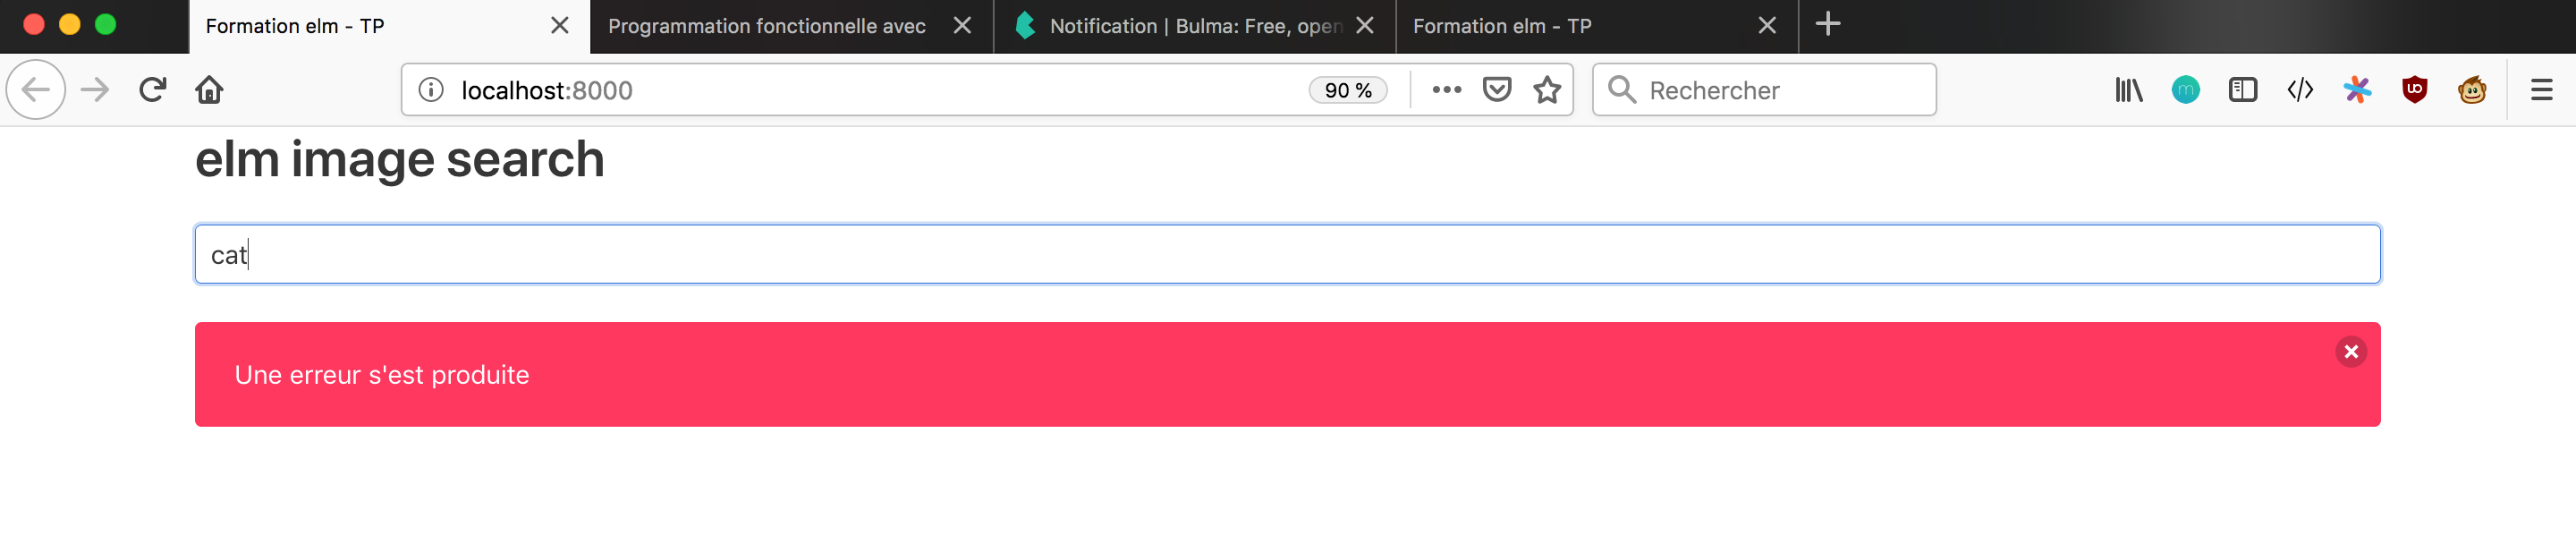
Temporarily remove the query parameter from the request to cause an error 400, or disconnect your computer from the network.
11.20. Expected result
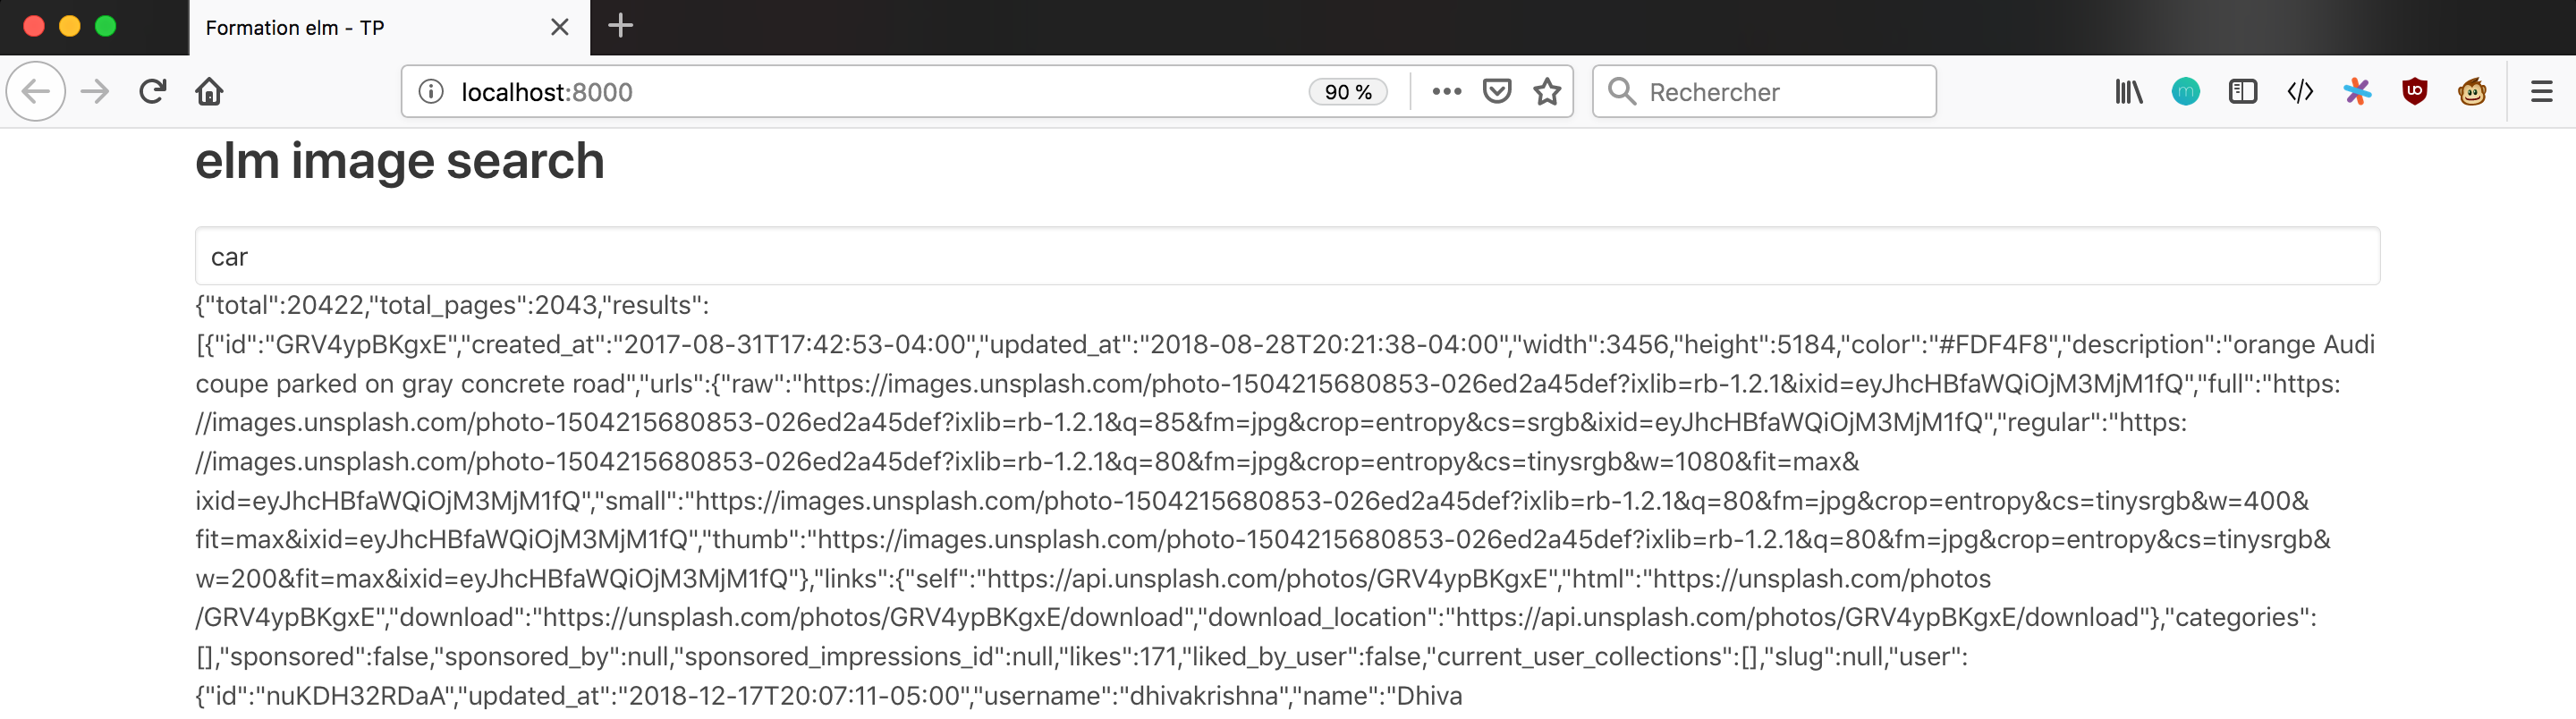
or

The code for this step is available on le dépôt github, at the tag step 4.
12. Decoding JSON
12.1. Function Application Operator
To convert the Json to elm data structures, we will need the operator |> :
-
<| means: evaluate the expression on the right, pass its value to the left
-
|> means: evaluate the expression on the left, pass its value to the right
viewUsername : User -> Html Msg
viewUsername user =
    div [] [ text <| user.firstname ++ " " ++ user.name ] --
is equivalent to
|
These operators allow a very elegant syntax for chaining calls (ex.: apply map then filter then sort to a list)
12.2. Response from the server
The server response is in the form:
{
    "results" : [
        {
            "urls" :
            {
                "thumb" : "http://...",
                "regular" : "http://...",
                ...
            }
        }
    ]
    ...
}
The API response to an image search request is a JSON object that has a results
property.
The value of results is an array of objects describing images.
Each of these objects has a url property, which itself has thumb and
regular properties that correspond to the image sizes we are interested in.
12.3. Declare the type to be received
-
install the
elm/jsonpackage -
install the package
NoRedInk/elm-json-decode-pipeline -
create an
Imagemodule in aImage.elmfile with the following content:
src/Image.elm
module Image exposing (Image, imageListDecoder)


import Json.Decode as Decode exposing (Decoder, field, int, list, string)
import Json.Decode.Pipeline exposing (required, requiredAt)

type alias Image =
    { thumbnailUrl : String
    , url : String
    }

imageDecoder : Decoder Image --
imageDecoder =
    Decode.succeed Image
        |> requiredAt [ "urls", "thumb" ] string --
        |> requiredAt [ "urls", "regular" ] string --

imageListDecoder : Decoder (List Image) --
imageListDecoder =
    field "results" (list imageDecoder)
imageListDecoder =
field "results" (list imageDecoder)imageDecoder converts the JSON received from the server to an
Image type |
|
| the content of urls.thumb will go in the 1st field of the record | |
| the content of urls.regular will go in the 2nd field of the record | |
imageListDecoder transforms the "results" field of the JSON into a list
of Image records,each of which is created using imageDecoder.
|
It is essential in the decoder declaration to respect the order of the fields in the Image type.
12.4. Change the type of message received
src/Main.elm
type Msg
    = InputChanged String
    | FormSubmitted
    | ResponseReceived (Result Http.Error (List Image))
The answer will be of Image list type and no longer of String type
12.5. Use the decoder
src/Main.elm
{ url =
        "https://unsplash.noprod-b.kmt.orange.com"
            ++ "/search/photos?query="
            ++ model.searchTerms
, expect = Http.expectJson ResponseReceived imageListDecoder
}
expectJson takes one more parameter than expectString: the decoder
to use to convert the JSON response into an elm data structure.
12.6. Storing images in the model
-
Delete the
responsefield of typeModel. -
Comment or delete the response display code
-
Add an
imagesfield to theModeltype -
Store the server response in case of success
-
Add a
messagefield to theModeltype -
Store the error message when necessary
-
Display this message, if any, under the input field
-
Simulate a network problem to test the display of the error message
-
Check the correct functioning of the image list part with the debugger
|
|
If there is no error, use If you want to use the |
The code for this step is available on le dépôt github, at the tag step 5.
13. Displaying responses
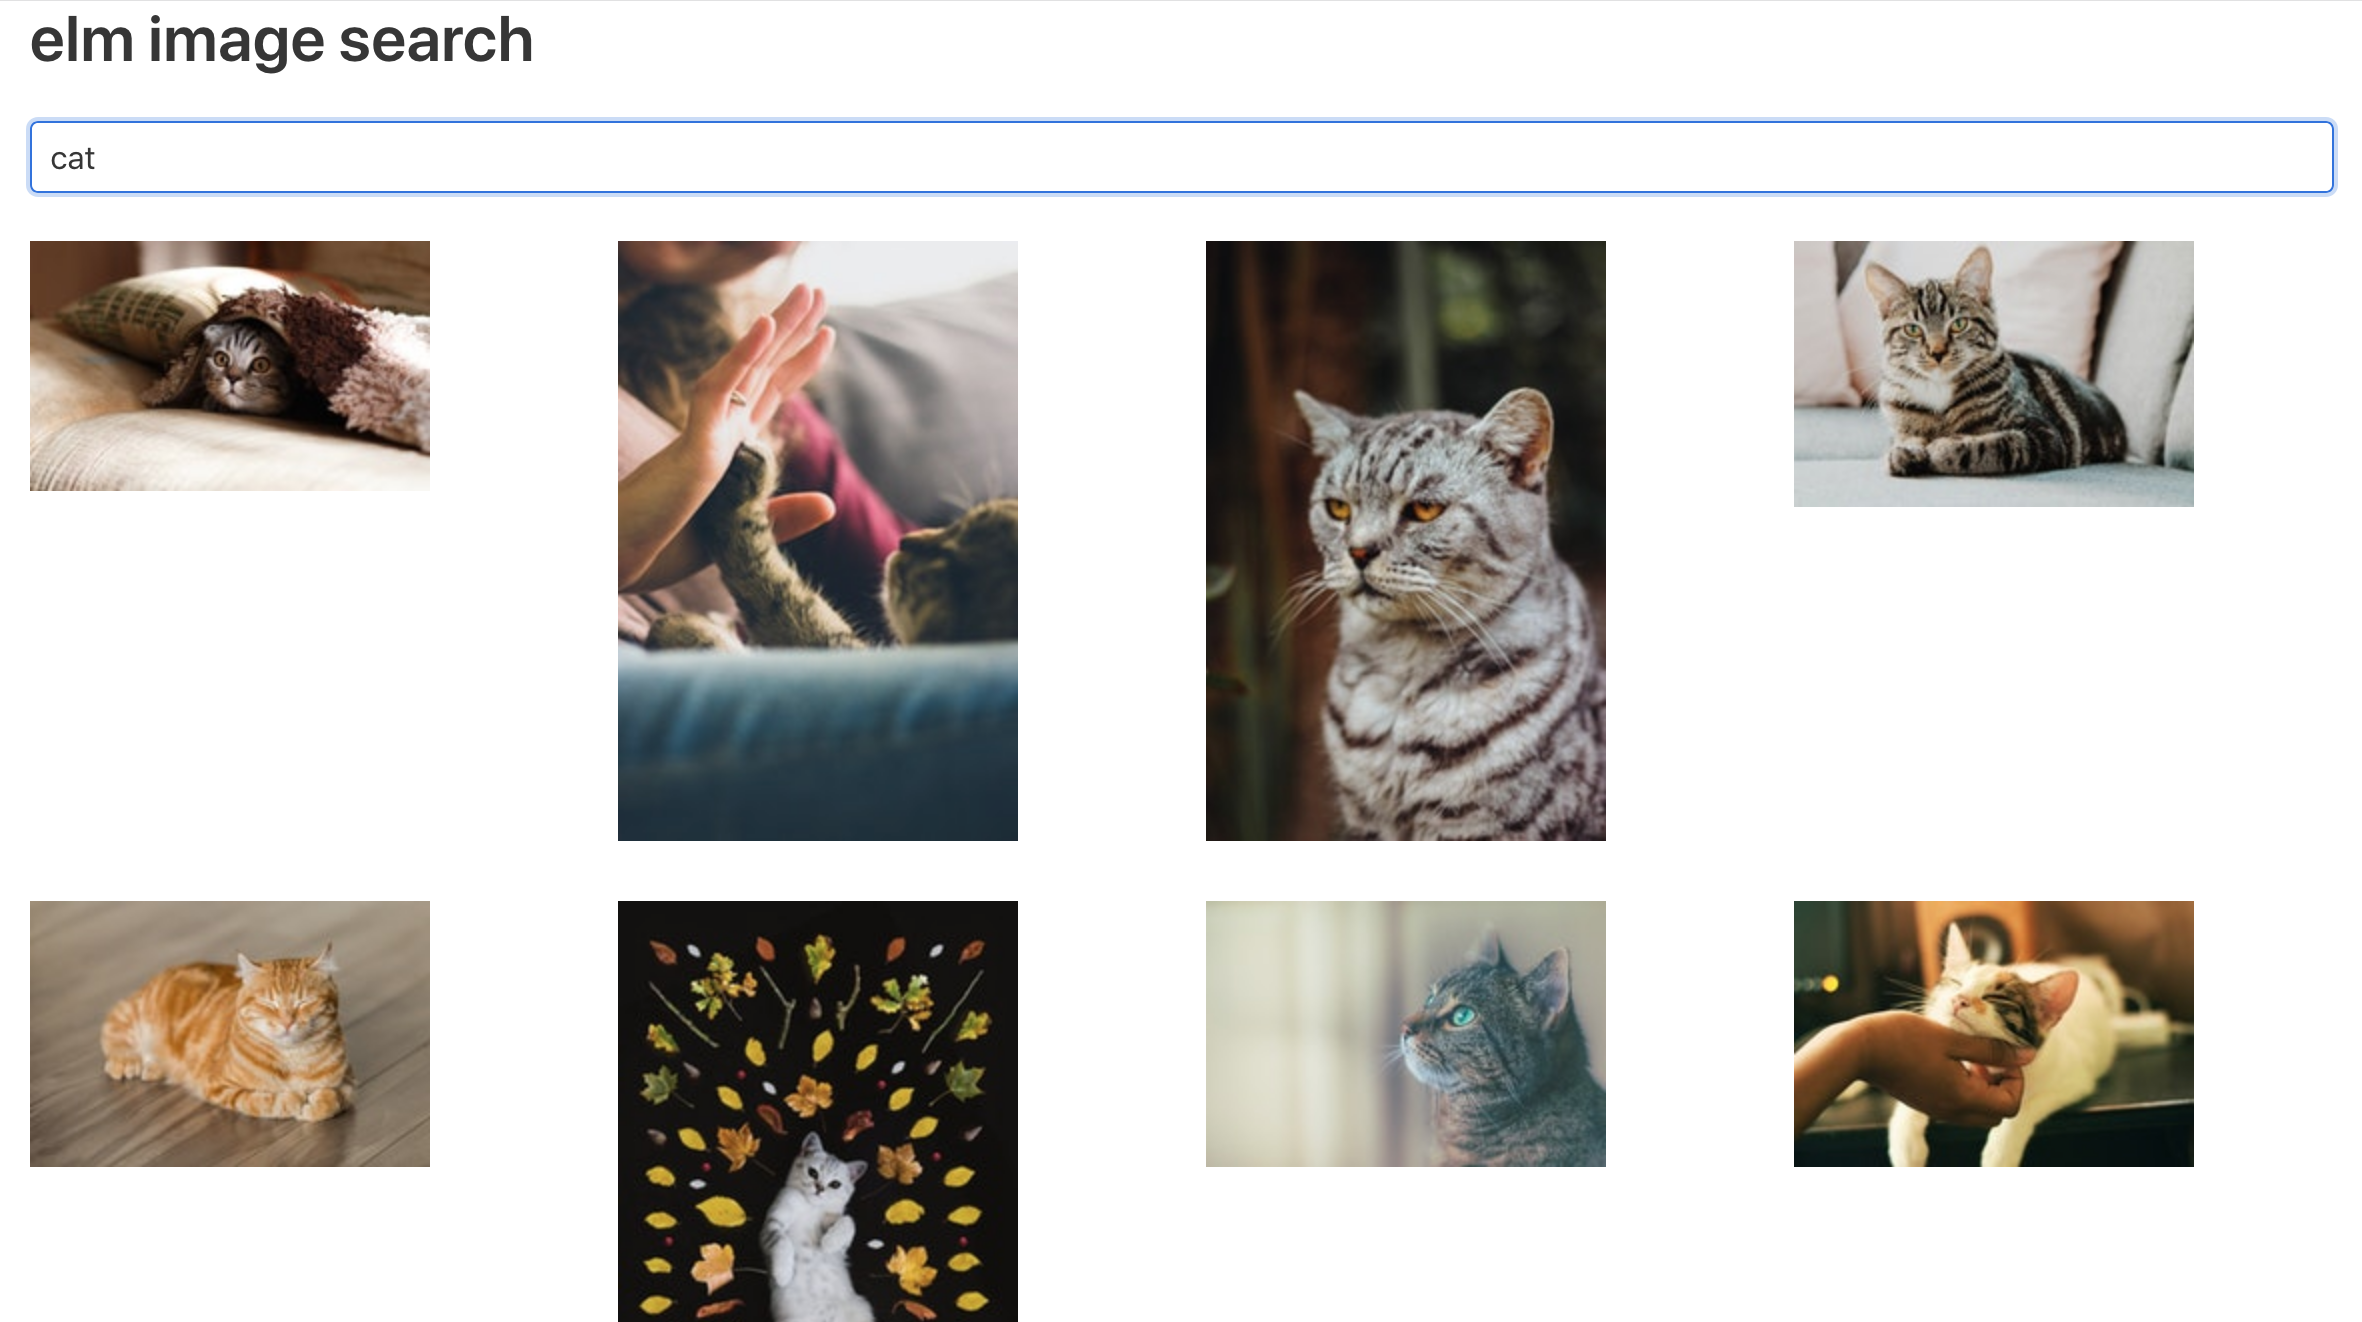
13.1. Show thumbnails
view model =
    div [ class "container" ]
        [ h1 [ class "title" ] [ text "elm image search" ]
        , viewForm
        , viewMessage model
        , viewResults model
        ]

viewResults : Model -> Html Msg
viewResults model =
    div [] (List.map viewThumbnail model.images)

viewThumbnail : Image -> Html Msg
viewThumbnail image =
    img [ src image.thumbnailUrl ] []
List.map applies the viewImage function to each of the elements in
the model.images list, and returns a list containing the results.
|
|
In functional languages, it is not possible to modify an index value at each
iteration, that’s why there is no for or while loop. |
13.2. Improving the presentation of images
-
add the CSS classes "columns" and "is-multiline" to the div that includes the list of images
-
display each thumbnail in a div having the CSS classes "column" and "is-one-quarter"
-
add a vertical spacing between the form and the answers
13.3. Expected result
13.4. Improving the display of the error message
-
use a Bulma notification to improve the presentation of the error message
-
a click on the button must hide the notification
-
the launch of a new search must hide the notification
|
|
HTML for displaying a notification with Bulma: <div class="notification is-danger"> <button class="delete"></button> Lorem ipsum dolor sit amet, consectetur </div> |
14. Test the business code
We would like to offer images adapted for Desktop on the one hand, and for mobile on the other hand.
You will therefore have to add a filtering mechanism for images according to their format: landscape or portrait.
14.1. Filter the images according to their format
-
enrich the Image type with
heightandwidthfields -
retrieve the value of these fields in the server response
14.2. Add the current mode to the model
The template must indicate whether we display the photos in portrait, landscape, or both
(default state).
-
declare a custom type
Formatin the moduleImage; the possible builders arePortrait,LandscapeandAny. -
export this type and its constructors with
exposing (Format(..), …) -
import this type and its constructors into Main, with the same syntax
-
add a
formatfield to the model -
give it an initial value of "Any"
14.2.1. Add a drop-down list
viewForm =
    form [ onSubmit FormSubmitted ]
        [ input
            ...
        , div [class "select"]
            [select
                []
                [ option [value "any"] [ text "Tous" ]
                , option [value "landscape"] [ text "Paysage" ]
                , option [value "portrait"] [ text "Portrait" ]
                ]
            ]
]|
|
14.3. Send a message when the selection changes
import Html.Events exposing (on, targetValue, onClick, onInput, onSubmit)
import Json.Decode
...
type Msg
  = ...
  | FormatChanged String

...
  , div [class "select"]
  [ select
    [ onInput FormatChanged
    ]
When the selection in the drop-down list changes, a message built with FormatChanged and the selected character string is sent.
14.4. Memorize the selected format
-
enrich the
updatefunction to store the selected format in the template
Hint: in a case, the branch _ → … is executed
for any value.
14.5. Write a filter function
We will write the unit tests that describe the behavior of filterImages before
implementing it.
-
in the
Imagemodule, create afilterImagesfunction, which takes as parameter aFormatand a list of images -
first, write
filterImagesso that it returns an empty list -
the final implementation of
filterImageswill return the list of images corresponding to the format passed in parameter
|
|
Putting the image list as the last parameter allows to link function applications (ex: map then filter then sort) |
14.6. Initialize the tests
-
type
elm-test initin the terminal, at the root of the project. -
rename
tests/Example.elmtotests/TestImage.elm -
open
tests/TestImage.elm -
rename the module to
TestImage. -
follow the link in the todo to display the documentation
-
replace the test suite in
TestImage.elmby the one in the documentation -
run
elm-test
Three tests should pass.
|
|
In addition to the basic tests, elm-test offers:
|
14.7. Content of a test module
-
A
Suiteof tests per module -
It is possible to nest calls to
describe. -
The Expect module provides assertions
-
Expect.all checks several assertions for a given value
14.8. Import the code to be tested
Only the public functions and types of the module to be tested can be accessed.
module TestImage exposing (suite)

import Expect exposing (Expectation)
import Fuzz exposing (Fuzzer, int, list, string)
import Image exposing (..)
import Test exposing (..)|
|
It is only possible to test what is public. |
14.9. Test and implement filterImages
-
Add a test that checks the behavior of the filtering function, for the Any value of the format.
-
Start the automatic execution of tests with
elm-test --watch. -
The test should compile, but it’s execution should fail.
-
Implement the filterImages function so that the test passes, using the most simple implementation you can.
-
Add a test for the Portrait value.
-
Adjust the implementation of filterImages.
-
Add a test for the Landscape value.
-
Adjust the implementation of filterImages
-
Use filterImages in
Main.elmto display only the images corresponding to the selected format
Recommendation: define test data outside the test suite
14.10. Tests: some recommendations
The elm-test doc gives recommendations for an effective testing strategy
The code for this step is available on le dépôt github, at the tag step 7.
15. Conclusion
This is the end of this first approach to Elm.
We hope you start seeing what makes Elm a so delightful language:
-
reliable applications: no errors in production
-
simplicity of the tools
-
useful error messages
-
fast compilation
-
packages cohesion: no conflict between packages
-
performance: it compares to the fastest JS frameworks, an is better than the most popular of them (source)
-
light weight of the JS compiled files (source)
-
welcoming community (try Slack)
-
last but not least, refactoring without risk, which probably is its killer feature.
16. Going Further
If you want to go further, there are books and online resources:
-
Book: Programming Elm by Jeremy Fairbank
-
Book: Practical Elm for a Busy Developer: you need to practice a bit before reading this one, it’s not for beginners, but I definitely recommend it
-
Support: the #beginners channel on elm slack
-
Newsletter: Elm Weekly
-
Forum: Elm Discourse
-
Conference: Elm Europe, 27-28th of June 2019, Paris
You can also complete the app you started here, by example by displaying the large version of the image when clicking a thumbnail.